When you have worked your way through the first two tutorials about brushes which can be found here and here, you should be able to follow and understand this exercise easily.
 I have prepared this tutorial for practical use in my classes, but I believe the studies should work this way too, if you have any questions, feel free to comment!
1. Understanding gradients
You have learned to make a variety out of 2 basic brushes and you have learned how to create your custom brushes, so you now need a way to fill the gaps between the edges.
There are several ways to do so but before we do that, it is important to understand how gradients work.
For that it is also important in which color mode you work, 16bit allows for a good balance and shows the most colors, while 8 bit might be OK for most uses.
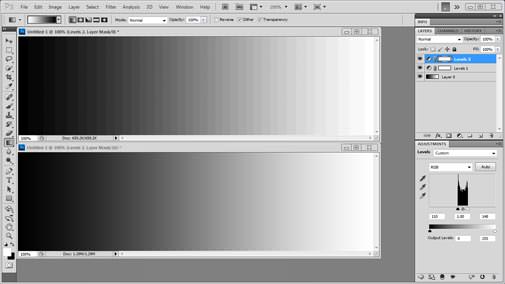
If a gradient proves to be difficult or creates banding, it is necessary to change to a higher bit depth. See the example below:
 |
| Follow the link to see the video explanation, courtesy of "The Art of Retouching" |
Gradients or gradientmaps can be easily done in Photoshop:
1.: Double-click on a layer and choose gradient-overlay.
2.: It´s also possible to do with adjustment-layers.
3.: By using the fill-tool (g) a sub-option allows to choose the gradient-fill-tool, which can also be used for radial filling

If you paint the area with an airbrush, you might end up with a similar result.
This is good if you want an artifical looking or a clean graphic, but for digital painting this effect is often unwanted. There is a need for smooth gradients, but the shapes are often so complex that you cannot easily use the fill tool. Adobe Illustrator offers a variety of tools to vectorize complex shapes, but that is not what we want, we want to handpaint.
 You see the different effect painted with a hard chalk-tip, the work definitly has a more painterly edge and feel to it, but that is maybe a bit too hard.
A middle-thing between the two version would be perfect to control the hardness at any point and remove it as necessary.
 Nothing easier than that: You should have your setup on two layers, background and the ball on another layer on top. From there its easy to add another layer, select the smudge tool, select the Standard brush that comes with your copy of Photoshop (see image right) and deselect spacing and add the little checkbox "all layers" from the brush-context menu at the top. This allows the brush to absorb the information from the layers below and bring it up to the new layer to be mixed together.
2.Scatter-to-blend technique
It is obvious that if you use hard edged brushes you cause banding and an overlay of hard edges due to transparency settings.

The first thing to mind is that this effect is common when working in photoshop and it is important that you don´t worry about that too much, its perfect to make sketches. One good thing to overcome that issue and keep moving forward is to keep the prior mentioned smudge-technique in mind. But that is just the beginning.
When working on surfaces you can do a lot by defining things through Levels, Shapes and Detail (LSD), assuming you have done your Levels and shapes, its time to think about the detail, let´s go:

Sketch above: Here I just used a rough chalk brush with medium grey to define levels and a shape, initially it is possible to recognize a women-torso after around 2 minutes. You see I don´t worry about overlapping brush edges too much, instead, they are welcome.

The hair is easy to blend with a hair brush, picking up shades with the eyedropper tool (ALT) and changing between dark and bright hair with X makes this blending operation easy.

The next step is done with one oval brush only, that one has a grid texture in it, it works smooth, hard edged and scattered, but for the refinement I only used that brush in its hard edged shape while pressure was controlled through the tablet.

This is the refined skin done with the same oval brush scattered and used in various sizes. And the smudge tool was used on some spots.

And here just some contrasting and highlighting with the dodge tool.
This is not about correct anatomy, which would be too much for a 15 minute spontaneous sketch, but the use of blending techniques might become clearer.
The possibility to use custom brushes and setting for brush tips and smudge tips as also mixer brushes, makes the variety of outcomes endless.
A good test to try the blending ability of a brush can be checked with a simple test image, see an example below:

The smudge tool mentioned above is my standard definition for blending as it is useful in nearly all occasions I may need it, from rough surfaces to smooth surfaces. But this brush-tip can be replaced by scattered chalk for example or others, you can try out what works best for your use. But everything seen below can also be done using a brush. It´s just a matter of preference, the positive thing about Photoshop is that the program makes no difference between brush, smudge, dodge and eraser, as long as it has a brush-tip, it´s a brush.

simple smudge-look

Speckle gradient look

crosshatch-gradient look

Matrix-digits-crosshatch-gradient look
It can be said that every shape is allowed, but some work better than others, from my experience I can say that round or organically shaped brush tips work better than squarish or hard edged ones. Really important is to disable spacing, otherwise the processor will take very long to process any stroke you do and the result will look unnatural too.
3. Color Blending
Color blending is a more difficult topic, because colors do not digitally behave the same way they´d typically do in the physical (subtractive) world.
The reason for that is simple, in RGB mode, the colorspace we work in, is limited and mixed through light, (additive) color system.
So, this means when painting in Photoshop with color, one can not simply throw in the colors, like we are used to in traditional Acrylics or physical airbrushing? Relax, it´s just theory.
The traditional colormixing of dry colors is easy to mimic, when working on a Yellow background for example you´d use a Magenta or Red in the physical airbrush to go over it, the result would be an Orange, the same works in Photoshop, only 50% brush visibility is needed to show that, no layer-effect, nothing else than plain paint on another plain paint.

Here´s another possible way, presented by Wen-Xi Chen (acidlullaby), a digital painting blending tutorial,
which can be found here, also relevant for older versions of Photoshop!
More tricky will be to achieve wet paint looks and such, the mixer brushes in the new Photoshop CS5 and CS6 are capable of loading a brush and emulate wetness and dry bristle effects, if that´s your cup of coffee, try it. Other than that, the technique above with the standard brushes allows absolutely great results too.
Havn´t worked too much with the mixer tool yet, to have a honest opinion about it, but the effects come close to what is possible with Corel Painter, they say, or SAI-Paint-tool.
One last thing I´d like to point out is that my current set of brushes that I use on a daily basis is a big collection from other artists, such as Anthony Jones, Dan Luvisi, Thierry Doizon who were so kind to share them and so it is the least I can do to share my collection.
These include my essential brushes, if I´d be on a lonesome Island, these brushes had to go with me...
Below you find a download link to the brush preset file, you have to place it in your preset folder in PS and load at startup, have fun with it!
'Download Fantasio Brushes


0 comments:
Post a Comment